Instagram is a giant social media platform, with over 1 Billion of total accounts, and over 500 million daily users in the world. However, it’s not a perfect platform, and some users have noticed that their pictures are worse on the platform when compared to the original photo.
Why does Instagram ruin your image quality?
Instagram uses massive compression algorithms in all uploaded pictures, which reduces the size of your photo, lowering the quality while freeing up a lot of storage space for the company. It’s important to decrease their costs and keep the platform for free.
That is the main reason why Instagram destroys your photo quality, but there are other specs involved in this process. I’ll cover all of them in this post and teach you how to stop Instagram from lowering the quality of your pictures. Take a look down below:
Contents
1. Reasons why the quality of your picture change on Instagram1.1. Compression Algorithms
1.2. Uploading with the wrong aspect ratio
1.3. Using an image format other than JPEG(.jpg)
1.4. Uploading images on Desktop
1.5. Android phone
2. How do you stop Instagram from ruining your photo quality?
2.1. Use the native camera of your phone
2.2. Compress on Photoshop/Lightroom before uploading
2.3. Check your internet connection
3. What if Instagram is also changing your photo’s colors?
Conclusion
1. Reasons why the quality of your picture change on Instagram:
Compression Algorithms
The principal reason for the low quality of Instagram pictures is the compression algorithm of the platform. It decreases the data on your photos to reduce the size they need in their data centers.
Let me show you this in an example. I uploaded one of my photos on Instagram to see how much the app would compress it. In my case, I uploaded a 5.67mb photo, with 4192×2760 pixels of resolution, and it resulted in a 0.061mb (61kb) photo with 1080×607 pixels of resolution.
By the way, I downloaded my Instagram picture on the ingramer.com website, which is a tool to download any Instagram photo.
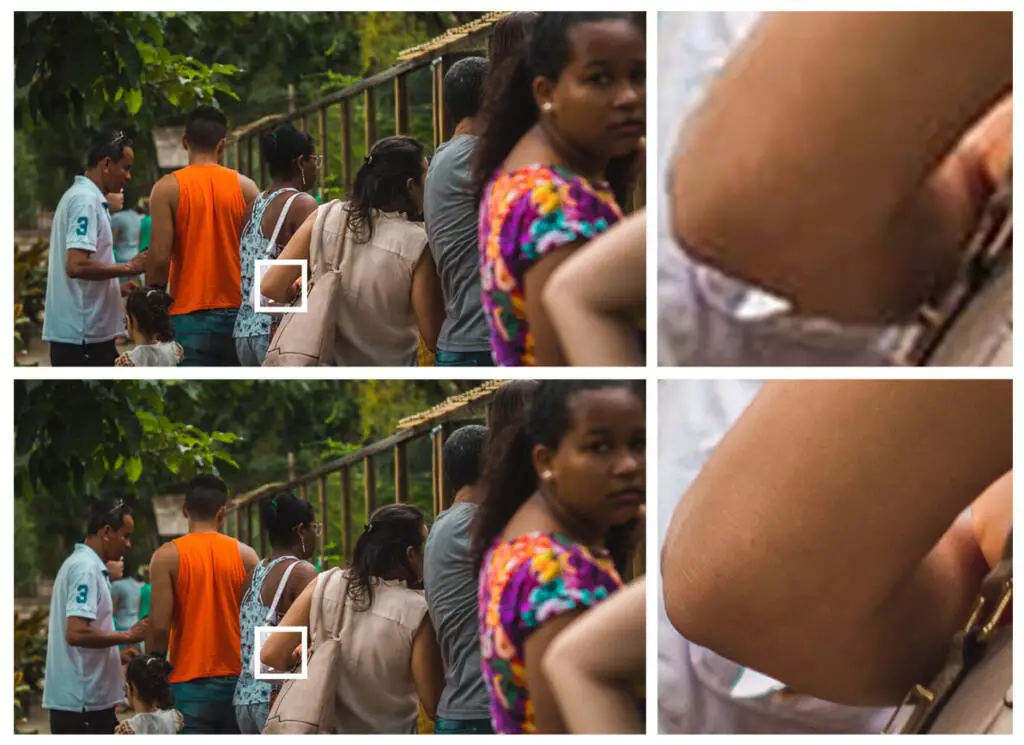
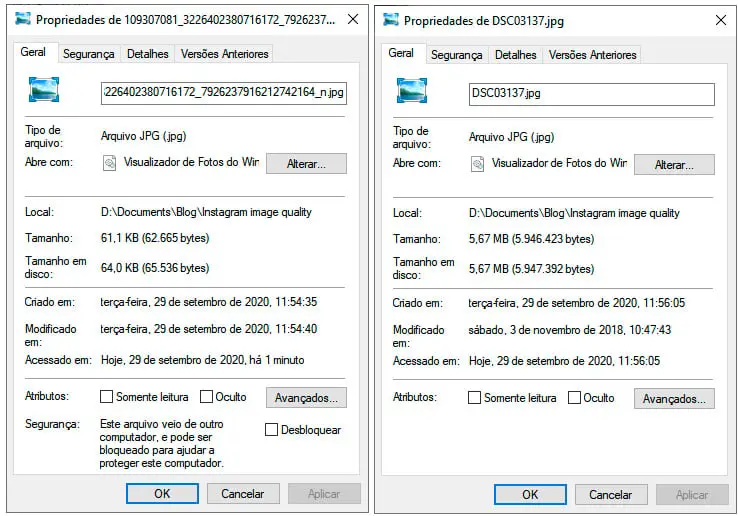
That was a compression of over 90% of the initial data! A great reduction like that always has some decrease in quality, as you can see in the first image. Because of that, the compression algorithm is the first cause of poor photo quality on Instagram.
Uploading with the wrong aspect ratio
Another reason why the quality of your picture change on Instagram is that you are uploading your images with the wrong aspect ratio and resolution.
I’ve included down below the best aspect ratios and resolution sizes for you to upload your photos on Instagram and prevent it from cropping and reducing your image quality.
When you upload a photo with the wrong aspect ratio or resolution on Instagram and you crop it there, the compression algorithm reduces your image’s worth a lot, because it’s compressing your file twice.
The first compression is done when Instagram crops your image to their recommended aspect ratio and resolution, and the second one when it uploads your picture on its platform.
The great enemy of the image quality on Instagram is the compression algorithm. This way, if your images suffer less compression during the upload, they’ll have better quality at the end of the process.
To reduce this compression when cropping the image on the app, you can crop it in a professional image editing software. On mobile, you can download the Lightroom app for free to do it, and on desktop, you can use the Lightroom CC and Photoshop, which are paid tools.
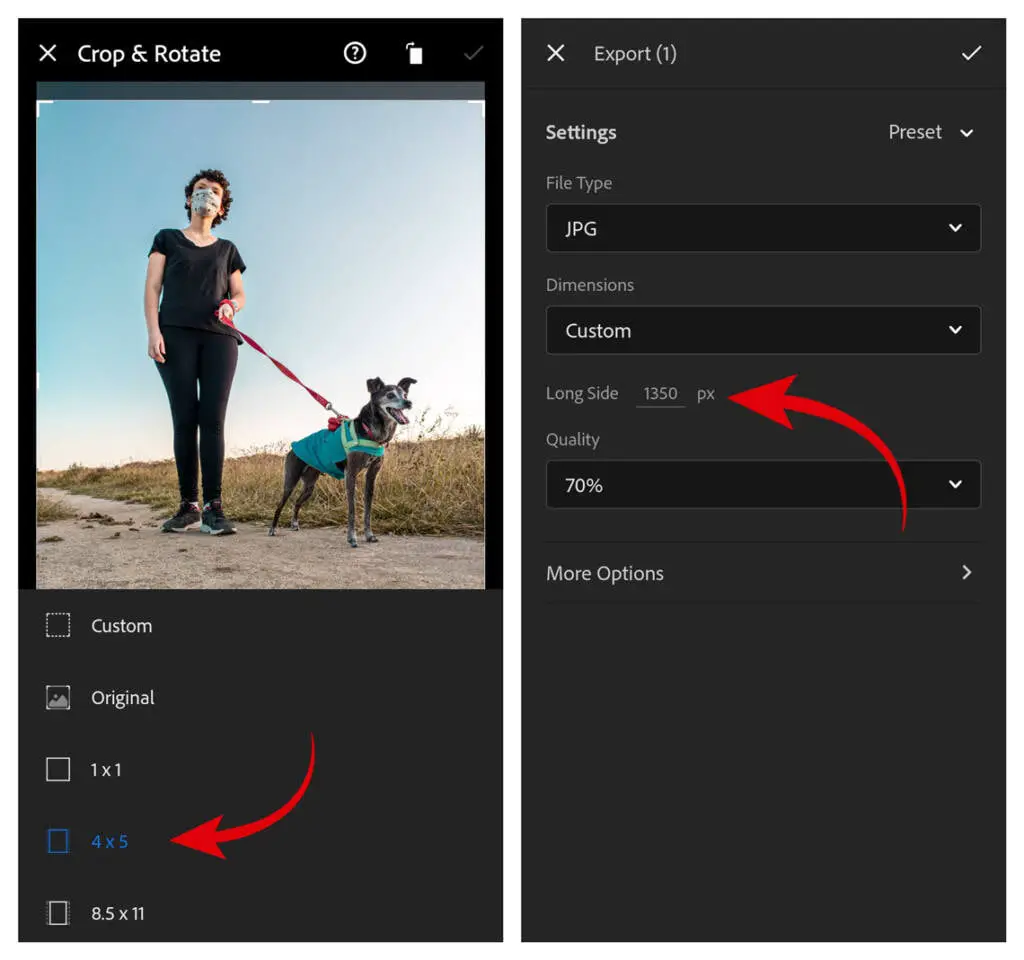
When you export your files on these editing softwares, remember to select the right resolutions, and you’re all set!
Using an image format other than JPEG(.jpg)
The native image format of Instagram is JPEG. This way, if you upload an image in a format other than JPEG (such as .png or bipmat), the app will need to convert it in the proper format. Everything that Instagram does for your image results in algorithm compression, which can destroy your image quality.
For this reason, if you want to maintain your image in high quality, you must upload it in the proper image format on Instagram.
Uploading images on Desktop
Instagram is a mobile-based platform, and it prefers you to upload your pictures in a smartphone to have the best results. So, the best way to keep your photo with the best quality possible is by uploading it on your phone.
Android phone
Did you ever notice that almost all the influencers on Instagram only use iPhones to do their jobs? Apple phones are a symbol of status, but besides that, the famous people on Instagram also use them to have better quality results when posting on social media, and it isn’t because of the phone’s camera quality.
Going to the mobile cameras reviewer DxOMark, we can see that the latest iPhone isn’t the winner when they compared the image and video quality professionally, and some android phones are ahead of the Apple phones on the podium.
I’m an android user, and If you also use an android phone, I need to be honest with you: We have a disadvantage on Instagram compared to the iPhone guys. However, contrary to rumors on the internet that Apple pays Instagram to have better results, the reason is way simpler than that.
The Instagram developers need to produce one version of their app for iOS, the iPhone Operating System, which only runs on a dozen smartphones, and another one for Android, which has millions of different smartphones released by different brands every year.
It would be a huge work for the Instagram team to make one version of their app for each different Android smartphone, and it would also cost a lot. Because of that, they prefer to release one generic android version, which runs on all the android phones. It’s not ideal, but there are good reasons to be like that.
So, Apple only has a few phones in its portfolio, and, because of that, the Instagram iOS developers have fewer problems to deal with when making the iPhone version of their app, which gives them more time and options to improve their iOS software.
However, these problems are more prevalent in Instagram Stories. If you are comparing the feed, the quality is similar between Android and Apple phones.
Also, there are some other tips you can use to improve your image quality on the Instagram app, which works for every phone. For example, you can use the native camera of your phone and compress your image in an editing software before uploading it on Instagram. I’ll explain to you better in the next paragraphs:
2. How do you stop Instagram from ruining your photo quality?
To stop Instagram from lowering your image quality, there are some tips you can use to reduce the amount of compression Instagram does in your photo:
Use the native camera of your phone
The Instagram camera is easily accessible and useful, but as like the other functions on the app, its camera compresses a lot of your image and destroys your photo quality.
So, instead of using the Instagram camera to produce your pictures, the best way to maintain your image quality is by shooting on your phone’s native camera, which has the right compression algorithm for you. After doing that, you just need to correct the aspect ratio with editing software and upload your picture on the Instagram app as usual.
Compress on Photoshop/Lightroom before uploading
The compression algorithms from the most famous editing softwares are way more precise and have better results than the Instagram algorithm. So, to avoid Instagram from ruining your image quality, it’s also a superb choice to compress your picture on an editing software before uploading it on Instagram.
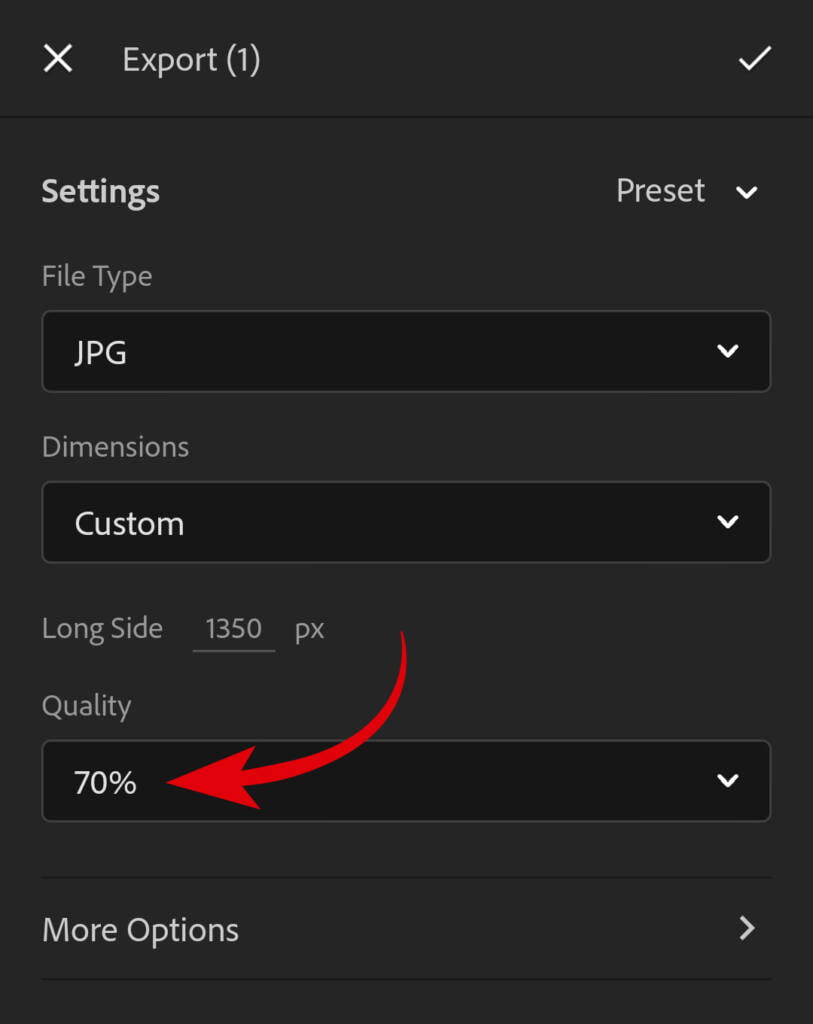
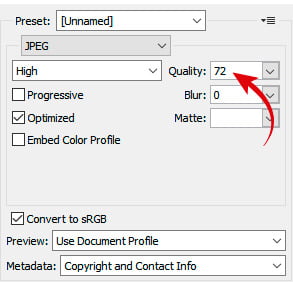
Here I include the compression percentage for you to put in your editing softwares, which will give you the best results when uploading your pictures on social media.

Compressing an image on Adobe Lightroom mobile 
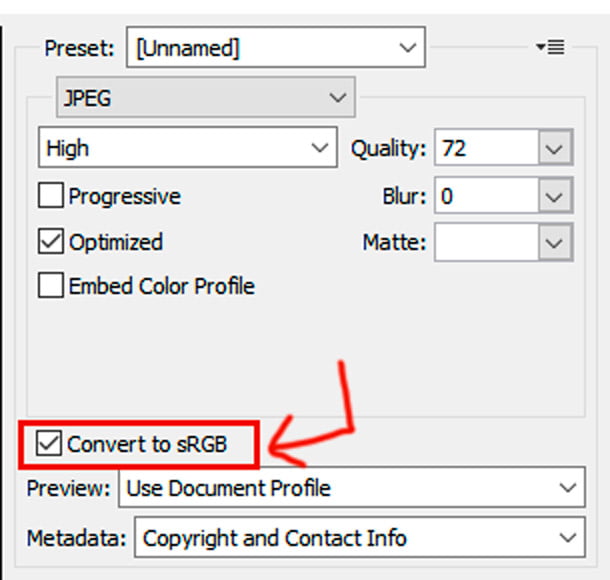
Compressing an image on Adobe Photoshop (Desktop)
Check your internet connection
If you upload your pictures in a poor-quality internet connection, the Instagram app has less processing power to compress and upload your photo. So, you will have low-quality photos and videos on your stories and feed when using a slow internet connection.
If that is your case, and you want to have better quality images on Instagram, it is good to upload your files when you connect to a fast Wi-Fi or 4G internet.
3. What if Instagram is also changing your photo’s colors?
The main reason why this is happening to you is related to the color profile you’re using in your photos when you upload them on the platform.
The color profile is like the color palette of your photo. Some color profiles have a wider range of color tones for you to use in your image, and others have a shorter range.
Commonly, the editing Adobe softwares saves your pictures with the Adobe RGB (aRGB) profile. This profile has a better range of colors, but it’s incompatible with the profile used on Instagram.
Instagram uses the sRGB color profile by default. So, if you try to input an image produced in a different profile, it’ll be difficult for the app to display your image with the proper colors on it because it uses another color palette.
To avoid it happening again, you need to change your color profile on Adobe Photoshop and Lightroom to sRGB. The way to do this is pretty easy, and you only need to change the color profile on the export settings to sRGB. Then, after doing that, your images will not change after you post them on social media anymore.
And that’s it, guys. I hope you had enjoyed the post!
What do you think about these tips? Did they work for you? Share with us in the comments!
If you have any question, ask me in the comment section down below, and I’ll respond to you as soon as possible.
Instagram is lowering your image quality because it uses a lot of compression algorithms in all uploaded photos. There are some ways to avoid it,…
If you want to put a white background in your photos in the quickest way, you can use the Remove.bg website. Another way is to…
The fungi love humidity and darkness. So you need to sunning your lenses daily and reduce the air humidity to kill them. Here I have…

Claudio Pereira
Author
He is a brazilian writing in english, a student of Medical School, and a Photographer during the free time. His passion for photography started in 2012 , and after discover it, he never stopped.

