The white background is extremely useful when you want to make a product photo album or if you want to make your subject “pop” from the photo. It’s easy to change your photo background to white, and you just need to use the right tools to make it.
So, how to get a white background for your photos? You can use the Remove.bg website to put a white background in your photos in the quickest way. Another way is to download the “Background Eraser” app, which is free but has less quality of the crop. The more professional choice is by using Photoshop, however, it needs more time to complete the job.
My name is Claudio Pereira, I have been a photographer since 2013, and I’m here to teach you all the options you have to put a white background in your photos. Take a look down below and enjoy it!
Contents
How do I get a white background on my photos?1. Background Eraser app
2. Remove.bg
3. Professional results
3.1. Free Option — Photopea
3.2. Photoshop CC
3.3. GIMP
Conclusion
How do I get a white background on my photos?
Well, there are lots of ways to make white backgrounds for photos, and these tools have differences in quality, workflow speed, and price. You need to know which of these characteristics do you prioritize when changing your photo’s background to white.
There are three major ways to make it. You can achieve it by using your phone with the proper phone app, in a Background remover website, or using Photoshop to have the most professional Results.
The phone app option has a good resolution, it’s for free, but has less quality of the crop, while the website automatic tool has good crop quality, but bad resolution when it’s free, and you need to pay to have a good resolution image.
The Photoshop option is the most expensive because you need to pay monthly to use this tool, but it has the best crop quality and the best resolution options, which make it the perfect tool for professionals.
1. Using your phone (Background Eraser app)
Almost everybody has a smartphone today, and you can use an Android or iPhone app to remove the background easily. If you are an Android user, I recommend you to use the app “Background Eraser” together with another app “SaveAsJPEG”.
If you are an Iphone user, these apps are named “Background Eraser 〜 Stickers !” and “JPEG-PNG Image file converter” in the App store, but they have the same functions as the Android versions.
These apps have the best results among all the mobile app options and are just around 10 MB, which is quick to download on any internet plan. I include down here the step-by-step on how to get a white background for your photos using them:
1) Find and download these applications in the APP store.

2) use the magic tool to remove whatever you want in the background.
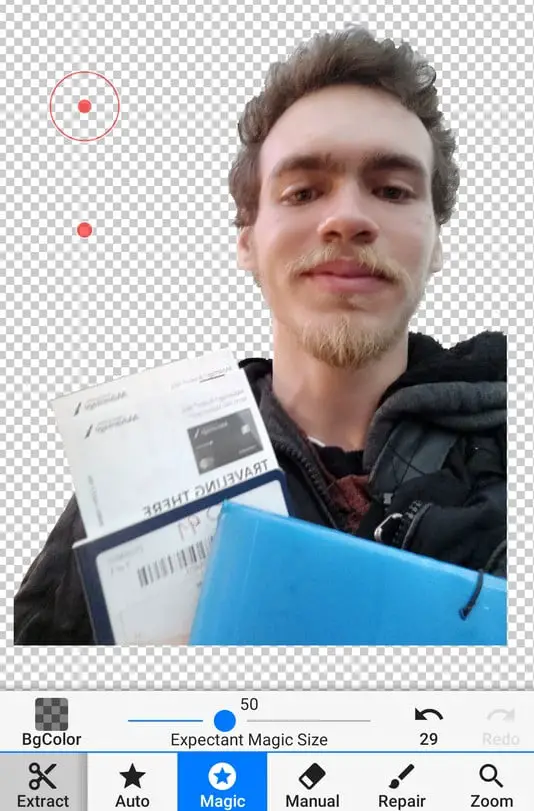
3) use the smooth tool to get a most refined result and click on the Save button
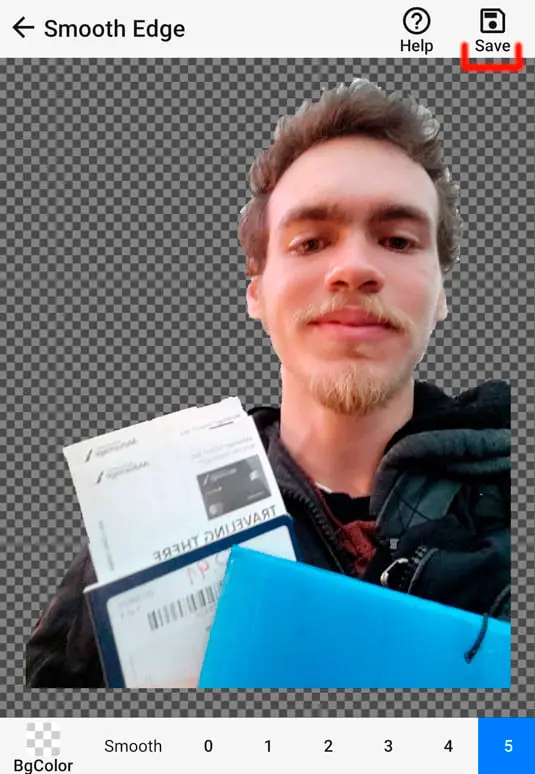
4) Open the “SaveAsJPEG” app, load your photo and save a JPEG image. After doing that, your image will be ready and with a white background.

2. On the Internet (Remove.bg Website)
This is the quickest and easiest way to put a white background in your photos. You just need to load your Photo onto the website, and they’ll do all the job for you. The website I choose here to do this job is Remove.bg, Because It has the most Accurate quality of the crop, between all the websites I tested, and it just needs 4-10 seconds to finish the image.
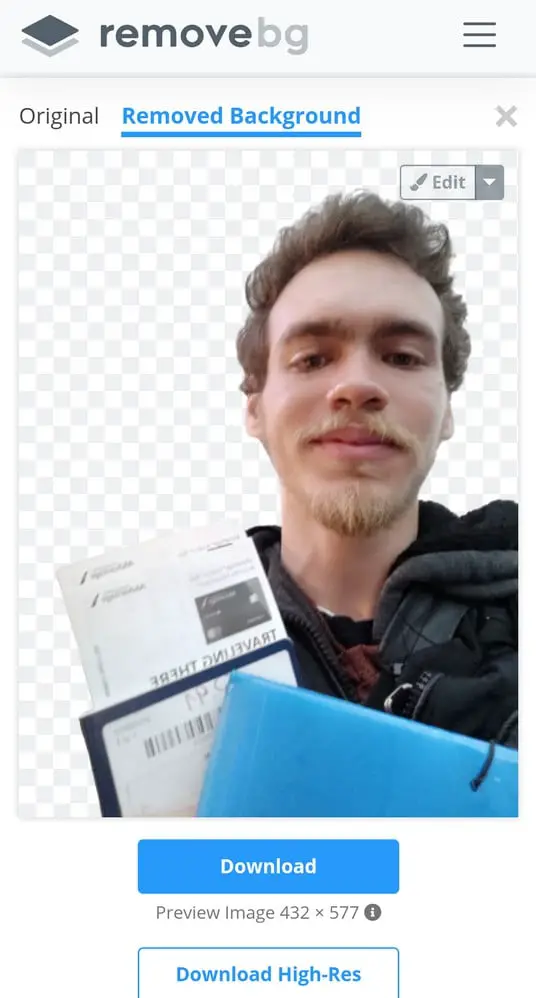
You just need to click on “Edit” and choose the white background to finish the image before downloading it.
You can download the photo with low resolution, which is enough to use in social media, and the only downside of this website is that you need to pay some money to maintain your image in high resolution.
Its quality of the crop is good, but it isn’t enough to maintain the quality of the hair strands. Also, because it’s fully automatic, you can have some errors in the final photo. In my example here, it cut my arm off from the edited image, which was not desirable. Because of that, the background removal website is sufficient for casual use, but not enough for professional use images.
If you want to make professional use of this image, like printing or selling a product, I would rather recommend you to use other tools, such as Photoshop, which has the best quality overall.
3. To have the best results (Photoshop CC or Photopea)
If you want a white background in your photo to use it professionally, the best way is by using a professional graphic editing program such as Photoshop, GIMP, or the free online editor Photopea. Photoshop is the Gold standing of graphic design and using it will help you achieve the best quality possible.
Free Option — Photopea
Photopea Is a good and free option to edit images Online and it works like Photoshop. The website has good algorithms and good editing workflow, but the results are somewhat worse than using the real Photoshop.
Here, I used the “Quick Selection” tool on the website to select my subject, which I wanted to put in a white background, and the process to do all this was at almost the same speed as in Photoshop.
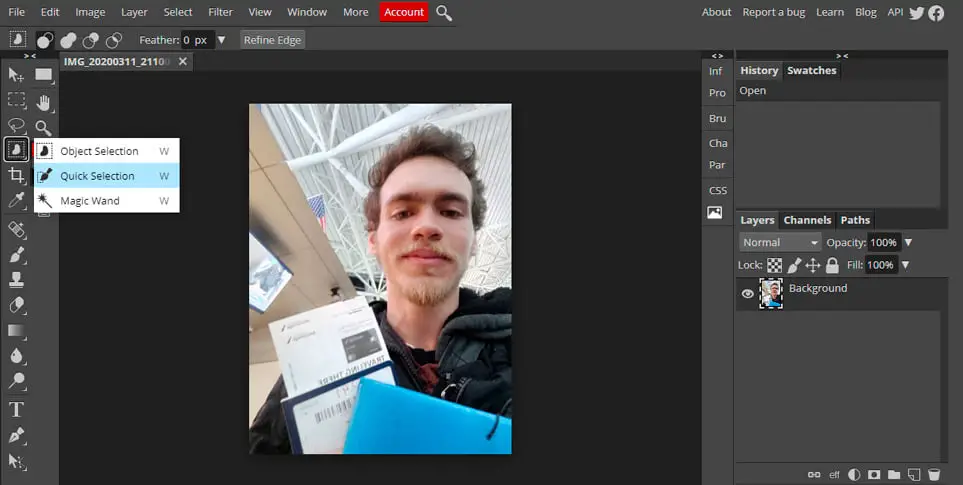
Select the subject you want to put in a white background with the “Quick selection” tool and go to the next step
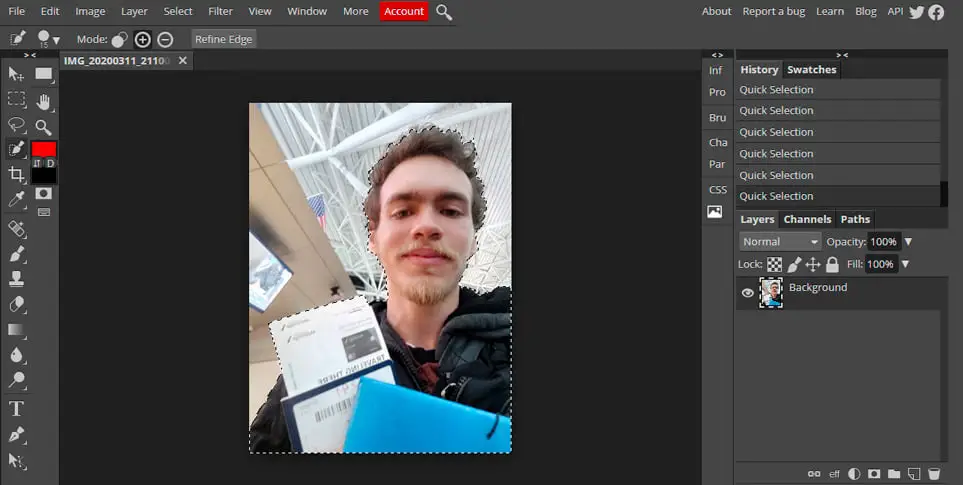
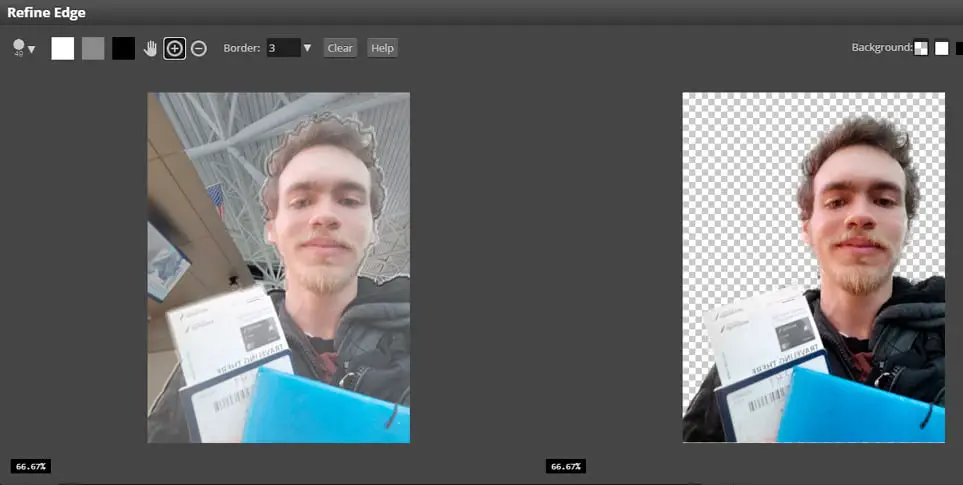
After doing that, I clicked on “Refine Edge” to fix the edges issues and have a better result
To finish your image with the white background, go to File >>> Export as >>> JPG (.jpg)
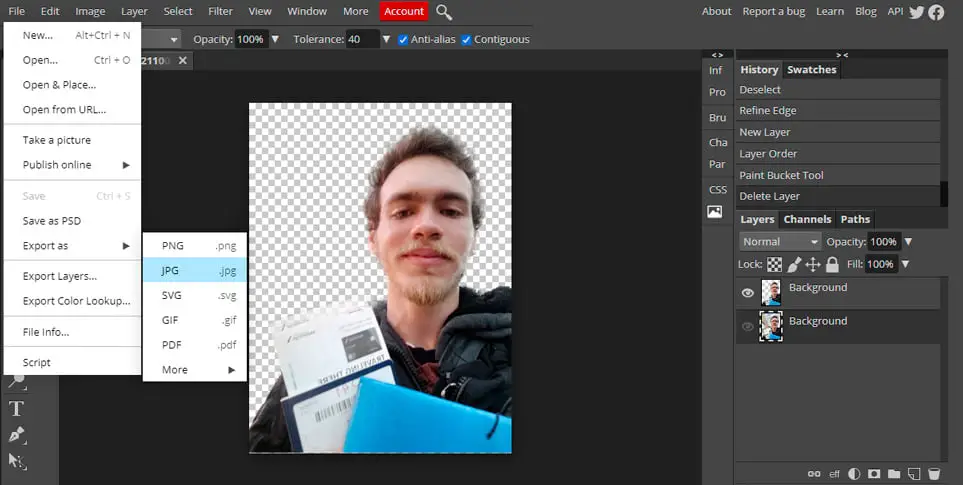
It took me between 3-4 minutes to finish the image. The results are better than the Background Eraser app and the Remove.bg website. However, it also has some troubles in the hair strands crop, which isn’t as precise as the Photoshop CC.

However, you can extract professional results if you have a subject without too many hair strands or edges and with just one solid color on the background, Because of that, it’s an outstanding free option to get a high-quality white background in your photos.
Photoshop CC
This is the best option for quality and professional works! Photoshop is the most famous graphic editor software because of its tons of options and flexibility.
You can also add effects like shadows and highlights with this software. The only downside is that it needs more time and experience to achieve the best results. On the other hand, all these specs have costs, and to have a Photoshop license you’ll spend US$9.99/mo.
Also, you can have 7 days free trial of Photoshop in this link.
If you make a white background for your photos with photoshop, the process is like in Photopea but has better algorithms to refine the edges, which makes a better result. I have a step-by-step for you down below:
1) Open the Photoshop and choose the “Quick Selection” tool
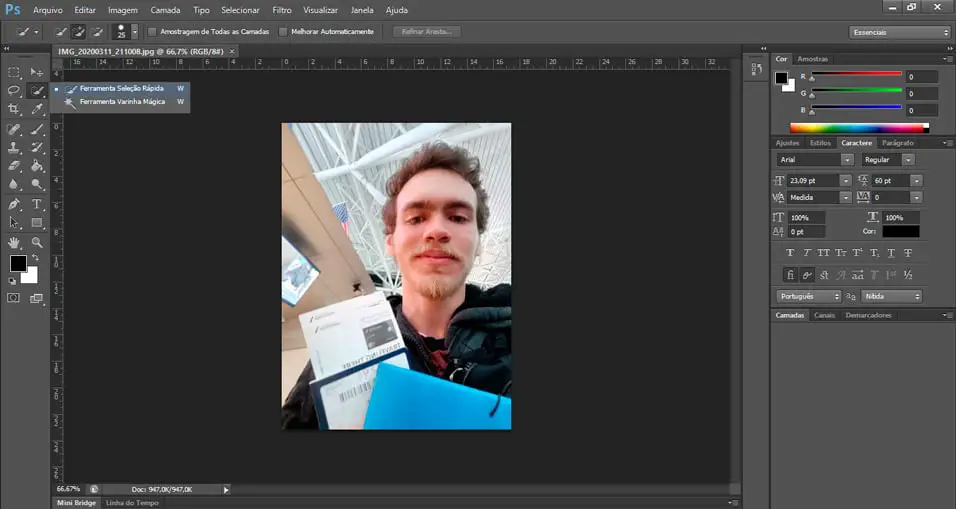
2) Select your subject clicking with your mouse, and click on “Refine Edges” at the top
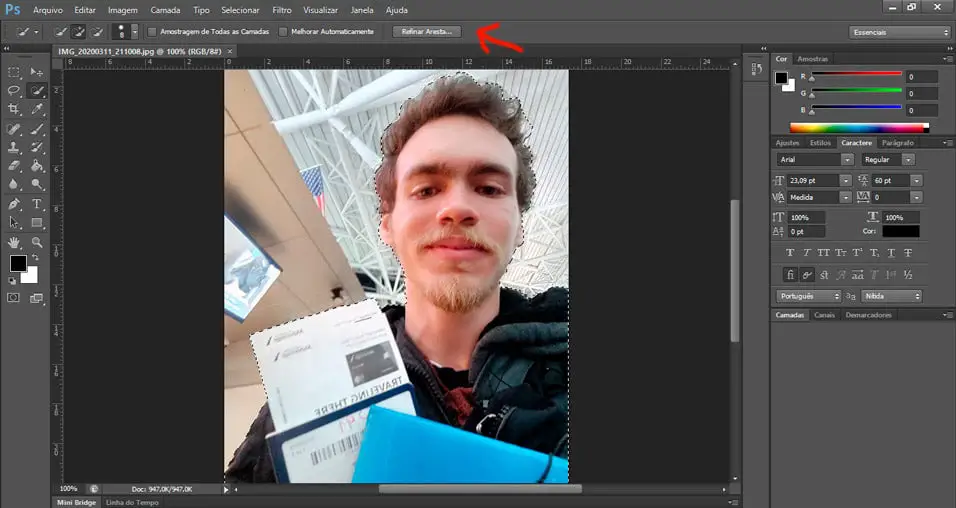
ADVICE: To deselect something that was automatically selected by the algorithm, just hold ALT and click in the area you want.
3) Use the “Smart Radius” pencil to remove the imperfections. It does everything like magic!
Use “Smooth”, “Feather” and “Contrast” if you want. Click on “Decontamination Colors”. It helps you to have a better image crop in the hair strands.
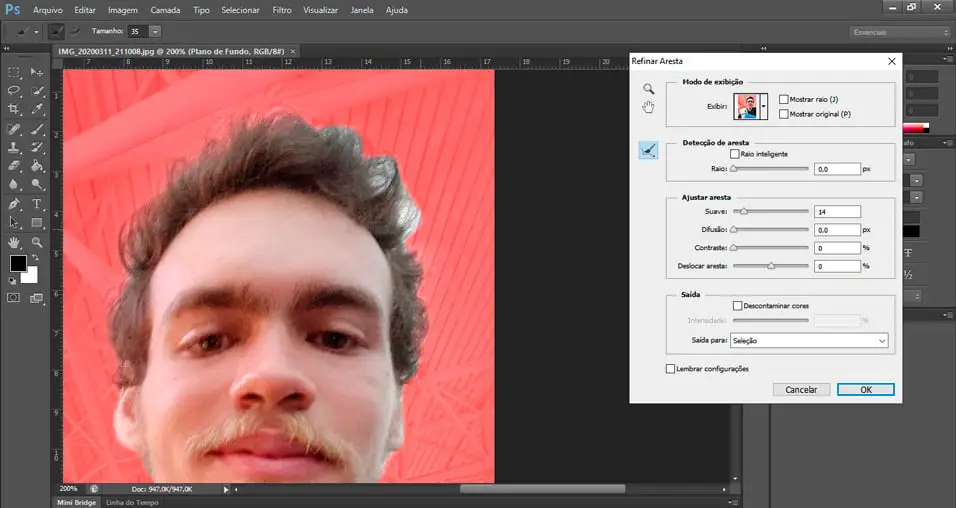
4) Go to “File” >>> Save For Web >>> Select “JPEG” >>> Save

Now it’s done! Because you choose JPEG when exporting, it automatically puts a white background in your image. Use it as you prefer!
If you also want to know how to improve your photography skills on a budget, I have this complete guide for you.
GIMP
Besides that, there is a Photoshop free software alternative called GIMP. It’s a bit harder to use than photoshop, but you can have awesome results too for free.
If you rather prefer to use GIMP as your graphic editor, here is a tutorial on how to make a white background using this tool:
Conclusion
So as you can see, It’s pretty easy to put a white background on your photos. Also, you have a lot of options to do it. You can do it easily with a phone app, you can do it in a website to automatically remove the background, Or if you want the best quality, you can do all the job in Photoshop, Which is quite harder than the Other options, But it’ll also just take you some minutes to finish.
That’s all guys, and I hope you had enjoyed the post. If it has helped you, be free to share it with your friends on social media, and look at my other blog posts.
If you have any questions, just put in the comment section, and I’ll respond to you as soon as I can.
Everything You Need To Know About The Brazilian Fruits Brazil is a continental-sized country with a rich culture and nature. Because of its climate diversity,…
Instagram is lowering your image quality because it uses a lot of compression algorithms in all uploaded photos. There are some ways to avoid it,…
If you want to put a white background in your photos in the quickest way, you can use the Remove.bg website. Another way is to…

Claudio Pereira
Author
He is a brazilian writing in english, a student of Medical School, and a Photographer during the free time. His passion for photography started in 2012 , and after discover it, he never stopped.
